How to reopen a Cinema 4D Lite file from After Effects CC
One of the coolest things about upgrading to Adobe CC is the integration of Cinema 4D Lite with After Effects. This is the first time Adobe users have been able to use a true 3D application inside AE.
I have been thoroughly enjoying learning the C4D interface via tutorials on the Greyscale Gorilla website, but ran into a problem when trying to reopen the C4D project files the following day. I just couldn’t figure it out!
After much searching, I found the trick – and so I thought I’d post it here so maybe the next person will have an easier time answering this question. Are you ready for it? Here it is:
Select the C4D file in your After Effects project and hit Ctl+E (Cmd+E on Mac). It’s just that easy. You can also go through the Edit menu and select “Edit original”.
That’s it. Hope this helps someone down the road.
Learn more about Cinema 4D integration with Adobe After Effects HERE.
Converting RGB to CMYK: How to keep color from washing out!
90% of the visual media I create is for television or internet, which means I design using RGB color space almost exclusively. However, occasionally I need to create a print ad or sign based on elements I’ve already created in RGB.
Anyone who’s converted an RGB image to CMYK knows how frustratingly different the end result can be. Typically, the most obviously perceptible change is less color saturation. The beautiful image you worked long and hard to perfect is now a shadow of its former glory.
I won’t get into the reasons why the color spaces are different, you can research that for yourself if you’re curious. What’s important here is doing your darndest to get your CMYK artwork as close as possible to the RGB original!
Here’s a super easy way to restore the color:
1) Add a new layer in Photoshop or Illustrator.
2) Fill it with black.
3) Set the color mode of the layer to Color Burn.
4) Adjust the layer opacity until you’re happy, usually in the 15-35% range.
I stumbled upon this trick while creating some business cards for print using an RGB background and am now applying the same trick to vehicle signage. Also, instead of applying a black layer to the entire image you can just use a soft black brush in the areas of most obvious change. You can also add a Hue/Saturation adjustment layer, but you may want to use it sparingly. Increasing saturation to a CMYK document appears differently than RGB. Finding a balance between the saturation adjustment layer and the color burn layer is a great way to get your CMYK conversion close to the RGB original.
Happy creating!
Do you like free music?
Solo rock artist Tim Bravo has just released his debut single “I AM” as a completely free download. CLICK HERE to learn how to get your hands on this rockin’ track!
Fall colors for 2011
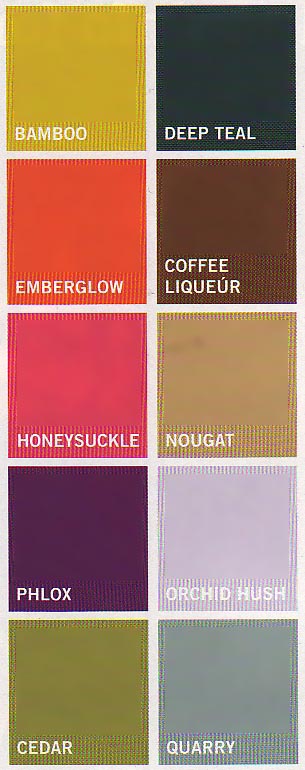
Graphic Design USA magazine has unleashed its Fall 2011 color forecast (somewhat cheesily “sponsored” by Pantone). I scanned the 10 color graphic for you. The names might be funny, but I can already see myself using a few of the prescribed hues.
After Labor Day, of course!
Attack and release: Bobby Owsinski’s tips for setting your compressor
 I’m always in search of learned gurus with a flare for communicating things I want to know. One of my gurus has repeatedly suggested following his own guru, Bobby Owsinksi. I pulled up my Google Reader today to peruse through a major backlog of unread posts to discover Mr. Owsinski had posted a simple, yet ingenious method for setting attack and release on a compressor. I can’t wait to try out this method, and I couldn’t resist passing it along to whomever might find it interesting.
I highly recommend checking out and subscribing to Bobby’s blog!
Here is his method:
Since the timing of the attack and release is so important, here are a few steps to help set it up. Assuming you have some kind of constant meter in the song, you can use the snare drum to set up the attack and release parameters. This method will work the same for individual instruments as well.
1) Start with the slowest attack and fastest release settings on the compressor.
2) Turn the attack faster until the instrument (snare) begins to dull. Stop at that point.
3) Adjust the release time so that after the snare hit, the volume is back to 90-100% normal by the next snare beat.
4) Add the rest of the mix back in and listen. Make any slight adjustments to the attack and release times as needed.
The Idea Is To Make The Compressor “Breath” In Time With The Song.
Fundamental Frequency Chart: Indispensible EQ Tool
Last night I recorded a bass track for my song “I Am”. I was meticulous about setting up mics; an SM57 and Beta52 about an inch off the grill, each centered on a speaker cone with a Rode large condenser at ear level set up in the best-sounding spot in the room. I dialed in the perfect tone for the song – super meaty since the bass line carries the song in the verses. I laid down the track and started a little preliminary mixing.
On listening back, it was readily apparent I had a problem. It was the first time I’d recorded an instrument in the “big room” in our studio and while there was a cool ambience I was shooting for, there were some obvious frequency issues! For starters, every time I hit a G it stood way out over the other notes. Plus, there were a couple other notes that were noticeably softer than the rest of the track.
What’s a recordist to do in a situation like this? Isolate the offending frequencies and tame them with EQ. More easily said than done…UNLESS you have a handy frequency chart to tell you what the fundamental is for the note you’re trying to tone down. You could use the “sweep method”, where you sweep through the frequency spectrum with a high Q (narrow bandwidth) until you hear where that note is more pronounced – but that can be time-consuming and you might end up not quite centered on the actual fundamental frequency you’re attempting to domesticate.
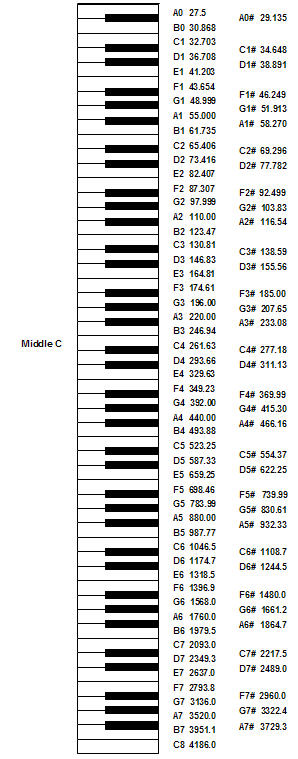
A much quicker and more accurate method is to just look up the fundamental frequency for the note on a chart. Trouble last night was, I didn’t have the chart! It took me a while to find, even with 3G, but I tracked down a graphic showing a full piano keyboard with the precise fundamental frequency for each note. Since it took me so long, I thought I would pass it along to you to save you the trouble!
Without further ado, I present you with an indispensible tool. If you ever need to cut or boost a particular note, now you don’t have to search forever to isolate it. Just punch the frequency into your EQ, narrow the Q and go!
You’re welcome.
Hello!
I just started this blog to augment my business website – and because I can’t help myself. I love to blog! I love to talk about, think about, and dream about media production gear and techniques.
To all my fellow audiophiles, tech nerds and gearheads: I hope you’ll join me and contribute where you feel so inspired.
Check out my gurus!
Everyone has their gurus. I certainly have mine, and I’m proud of ’em. So proud, I decided to put them in my blogroll. Check them out to the right. Are you a recordist? Joe Gilder is phenomenal and gives away more info for free than you can shake a stick at on his site Home Studio Corner. He also has some paid courses that’ll keep you learning for weeks.
Want to learn how to finish audio right? Ian’s mastering blog is for you!
Are you a graphic animation nerd? Andrew Kramer’s Video Copilot is stacked with free tutorials that’ll blow. your. mind.
Share and share alike!


You must be logged in to post a comment.